
Freedive!
CHAPTER
EXCERPTS
|
|
FREEDIVE!
by Terry Maas and David SipperlyFreediving
Technique
Soft, smooth, quiet, confident, serene,
peaceful: all these adjectives hint at the intense pleasure well-trained freedivers feel.
Imagine coasting below the waves, playing "pass the leaf" with wild dolphins,
flying in formation with giant manta rays or simply joining a school of fish. Without a
mechanical breathing apparatus, you're truly free-free to flow effortlessly into the
womb-like, enveloping water, free to join the ocean not as an interloper but as a welcome
friend.
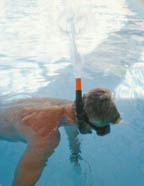
Lying at the surface face down, you take slow, deep, quiet breaths. Your body is totally
relaxed, your mind open and free of anxiety. Gently sealing your nose, you pre-equalize
your ears. While kicking lightly to give yourself some forward momentum, you
simultaneously take your last full-capacity breath, flood your snorkel, bend at the waist
and raise one of your legs. Without making a splash, you leave the surface in a perfect
inverted dive.Slow, streamlined kicks propel you until gravity overcomes buoyancy and you
glide downward-effortlessly. Multiple, frequent ear-clearings help prevent ear
discomfort............
How should you learn freediving? Not like the newlyweds we
observed in Hawaii. The young man coaxed his new bride into the water, assuring her she
had nothing to fear. Timidly she placed the unfamiliar snorkel into her mouth,
flip-flopped to the reef’s edge and jumped in. In the water, she bicycled furiously
with finned feet, clawed the water with her arms and made a brave attempt to look into the
surging water before declaring, “I can’t!”
What happened? Unfamiliar with the equipment, uncomfortable in the horizontal position,
and hammered by the heart-racing cold and fear of animals lurking at her feet, she
panicked. Remember, freediving is about familiarity, ease, relaxation and energy
conservation.
To learn to freedive, find a competent, patient instructor who will guide you through the
selection of your gear and introduce you to the basic elements of the sport in a
step-wise, confidence-building fashion.
This chapter is not intended to be a teach-yourself program. While we have numbered each
exercise, your instructor should select both the exercises and their order of introduction
into your unique training program. Avoid advancing until you’re ompetent with the
last step.
Basic Pool Exercises
Since comfort in the water is the key to freediving, let’s
start with a simple, yet effective, relaxation exercise, the floating fetal
position.” (If you’re not familiar with how to use a snorkel or mask, skip ahead
to those sections and then return to this exercise.)............
Your fins
Choose flexible fins and wear socks or rubber booties for protection against foot chaffing
and ulcers. The foot pocket should fit firmly without causing pressure points or cramping.
Your feet should not slide inside the fin when you shake your foot up and down or side to
side.
Like our young honeymooner, many beginners tend to flex their knees deeply and appear to
“bicycle” through the water. They often make large and unnecessary arm and hand
movements. Remember, keep your hands relaxed at your side. Flailing arms and excessive
knee flexing waste your valuable energy, cause efficiency-robbing drag through the water
and make a lot of noise, which scares away marine life. When you kick, use your hip and
knee joints equally. If you flex your knee too much (bicycling), loosely wrap your knee
joint with a bandage as a reminder to use straight-legged kicking from your hip. Be sure
to keep your feet below the water when you swim on the surface.
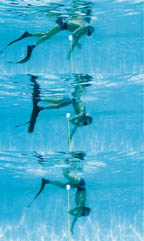
Before graduating to open-water training, you should master three fin-kicking strokes: the
basic slow-flutter kick, the frog kick and the dolphin kick. You’ll use the basic
slow-flutter kick stroke about 90 percent of the time. Keep the strokes even and smooth.
Kick gently, don’t overpower the fins and keep the blades in the same plane as your
leg stroke to prevent water from “spilling off” the side of the fin.
Because of the flexible and elastic nature of freediving fins, it’s important that
you understand how they work. As you kick, your fins produce forward motion when the
blades displace water backwards. Additionally, the fin blade’s natural recoil
provides some propulsion...........
 . .
EAR CLEARING
The expert freediver learns to clear his ears easily by
developing control over a certain group of muscles in his throat that assist the opening
of the eustachian tubes. This is the same muscle group that moves with the other muscles
in you head and neck when you swallow or perform exaggerated jaw and tongue movements.
When you apply pressure to your nose, control over this special group of muscles bypasses
the need to swallow or move your jaw in an attempt to clear your ears.
The primary muscles in this group are referred to as the Tensor veli palatini and the
Levator veli palatini (the elevators of your soft palate). When you swallow, your jaw,
tongue, adam’s apple and soft palate (the soft back part of the roof of your mouth
where a tissue tag dangles into your throat) all move upward. It’s not necessary for
your tongue or jaw to move for ear clearing—just your soft palate and adam’s
apple..............
Exercise 13: Surface dive
After resting on the surface long enough to flush out carbon
dioxide and to replenish your lungs with oxygen, you’re ready to start your
surface-dive exercise. You should feel completely relaxed; your breathing rate should be
slow and regular. Your breaths should be somewhat deeper than normal—at least 150
cubic centimeters (a half-cup of air) to cancel the effects of the extra, snorkel-induced,
dead-space air.
Progressively increase the depth and rate of your last three breaths, starting with a
relaxed breath and progressing to the deepest breath you’re capable of drawing.
Remember to make full use of your diaphragm. For your last breath, forcefully exhale to
the maximum and then fill your lungs to capacity. During these last breaths,
simultaneously pre-<d>equalize your ears and initiate forward momentum by using
either a flutter or a frog kick. Forward motion helps improve your surface entry.
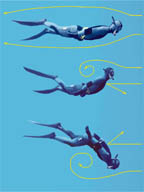
At the moment your lungs fill, break your body at the waist, raise your left leg to the
vertical position and bring your right hand up to the nose-sealing position on your mask
by making a smooth “S” pattern with your arm. Slip your hand sideways through
the water to minimize water resistance. Three to five full kicking strokes should get you
to the neutral point (where you neither sink nor float), after which little, if any,
kicking is required to continue the descent. The sensation of falling through the water is
a good indication that you have made a perfect surface entry...............
Your dive buddy
Dive with a buddy whenever possible. There is always safety in numbers, and most divers
enjoy sharing their experiences with others. Even if your buddy is unable to assist you,
at least that person knows your general location. If you do dive alone, be sure to leave
your detailed dive plan with a friend and notify that person if your plan
changes...............
We hope we have made our message clear: freediving, like most sports, depends on
professional training, good gear and liberal doses of common sense. Had the honeymooner,
mentioned earlier, been properly introduced to her gear and received advance pool
training, her Hawaiian experience would have been pleasurable instead of disappointing.
Safety in the water requires forethought. You should have a plan to handle common
emergencies, and you should pause a few seconds to consider what might go wrong before you
attempt something new. Freediving takes commitment. Make that commitment and you’ll
enjoy an exciting, rewarding sport for your entire life....
|